Moving out of a rental property comes with a long list of tasks, and understanding what is post-tenancy grime buildup is one of the most misunderstood parts of the process. Most tenants assume a quick vacuum and wipe-down will satisfy the inspection. The reality is that landlords draw a very clear line between normal wear and tear and accumulated grime that tenants are legally responsible for removing. Getting that distinction wrong can cost you a significant chunk of your bond. This guide explains exactly what grime buildup is, where it hides, and how to tackle it properly before you hand back the keys.
Table of Contents
- Key takeaways
- What post-tenancy grime buildup actually is
- Where grime comes from and where it hides
- Effective cleaning methods for tackling grime
- Documenting condition to protect your bond
- When to call in professional cleaners
- My take on where tenants go wrong
- Let Grimescene handle the hard work
- FAQ
Key takeaways
| Point | Details |
|---|---|
| Grime goes beyond normal dirt | Post-tenancy grime includes grease, soap scum, mould, and mineral deposits that exceed regular wear and tear. |
| High-risk areas get overlooked | Kitchens, bathrooms, and soft furnishings accumulate the worst buildup and are the first things landlords inspect. |
| Gentle methods protect surfaces | Natural agents like vinegar and baking soda remove grime without damaging finishes or risking costly repairs. |
| Documentation protects your bond | Dated photos and videos from move-in and move-out are your strongest defence against unfair cleaning deductions. |
| Professionals save time and money | When buildup is severe, professional cleaning often costs less than the bond deduction it prevents. |
What post-tenancy grime buildup actually is
There is a meaningful difference between a property that looks lived-in and one that has accumulated grime through neglect. Post-tenancy grime buildup is defined as dirt, grease, soap scum, or mineral deposits that exceed normal wear and tear, making tenants responsible for a thorough deep clean at the end of their lease.
Normal wear and tear covers things like minor scuffs on walls, small carpet indentations from furniture, and light dust on shelving. Landlords expect these after months or years of regular use. What they do not accept, and are entitled to charge for, are things like:
- Caked-on grease inside an oven or on range hood filters
- Bathroom mould spreading across grout lines and silicone seals
- Heavily stained carpets from spills left untreated
- Limescale rings around taps, shower screens, and toilet bowls
- Sticky, grimy buildup on kitchen handles and appliance surfaces
The critical distinction is neglect over time. A single dusty shelf is normal. A film of grease across every kitchen surface after two years of cooking without regular cleaning is not. Excessive grime buildup causing mould or surface damage is not considered regular wear and tear, and it justifies landlord cleaning charges or bond deductions.
Understanding this boundary is not about being intimidated by your landlord. It is about walking into your final inspection with confidence, knowing you have done what is genuinely required.
| Normal wear and tear | Tenant cleaning responsibility |
|---|---|
| Minor wall scuffs | Caked grease on oven surfaces |
| Small carpet indentations | Heavily stained or mouldy carpet |
| Light dust on surfaces | Limescale on taps and shower screens |
| Faded paint from sunlight | Mould across bathroom grout and seals |
| Loose door handles from use | Sticky residue on kitchen appliances |
Where grime comes from and where it hides
Grime does not appear overnight. It builds gradually through everyday behaviours, and that slow accumulation is exactly why tenants are often caught off guard at the end of a lease.
In the kitchen, airborne cooking grease is the main culprit. Every time you cook without adequate ventilation, fine grease particles settle on surfaces, handles, cabinets, and appliances. Sticky and greasy buildup on frequently touched kitchen surfaces like refrigerator handles accumulates quickly due to oils, dust, and airborne grease. Over months, this turns into a tacky, discoloured film that becomes increasingly difficult to remove.
In bathrooms, soap scum and mineral deposits from hard water are the main offenders. Every shower leaves a thin residue of soap, skin oils, and mineral particles on tiles, screens, and taps. Without weekly wiping, these layers compound into a chalky, stubborn crust.
On carpets and soft furnishings, the issue is usually a combination of tracked-in dirt, food and drink spills, and pet residue. These stains oxidise and bond to fibres over time, making simple vacuuming useless by the time you move out.
Overlooked areas that frequently fail inspections include:
- Behind and underneath large appliances
- Inside kitchen cabinets and drawers
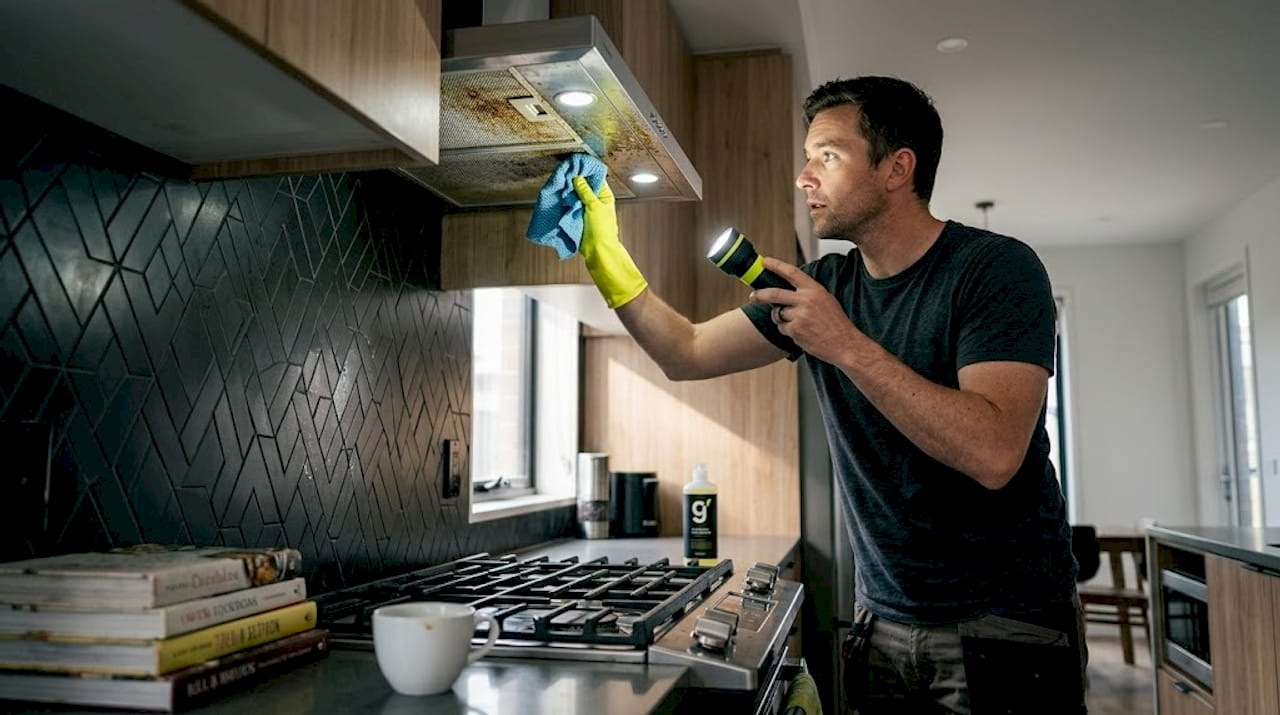
- Exhaust fans and range hood filters
- Window tracks and sill edges
- Skirting boards and door frames
Poor ventilation worsens every category. Properties without adequate airflow trap moisture and cooking vapours, which accelerate both mould growth and grease deposits. If your property had condensation issues or felt stuffy, expect more buildup than average.
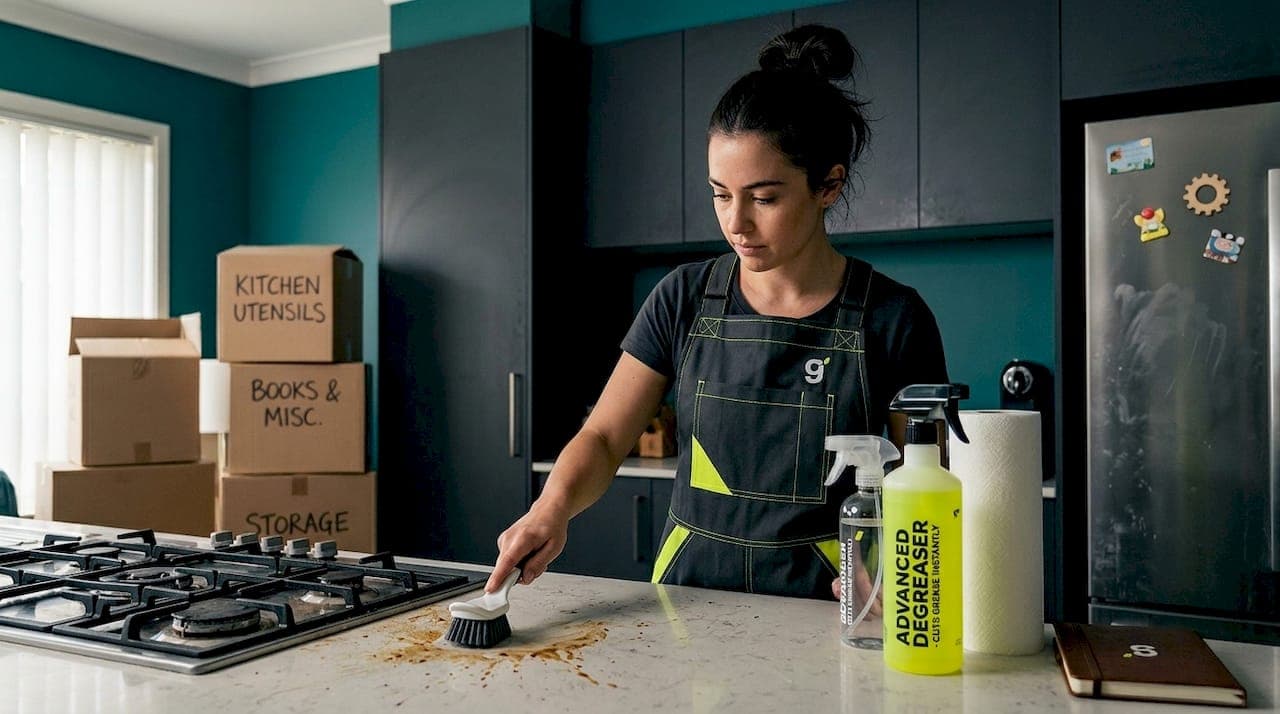
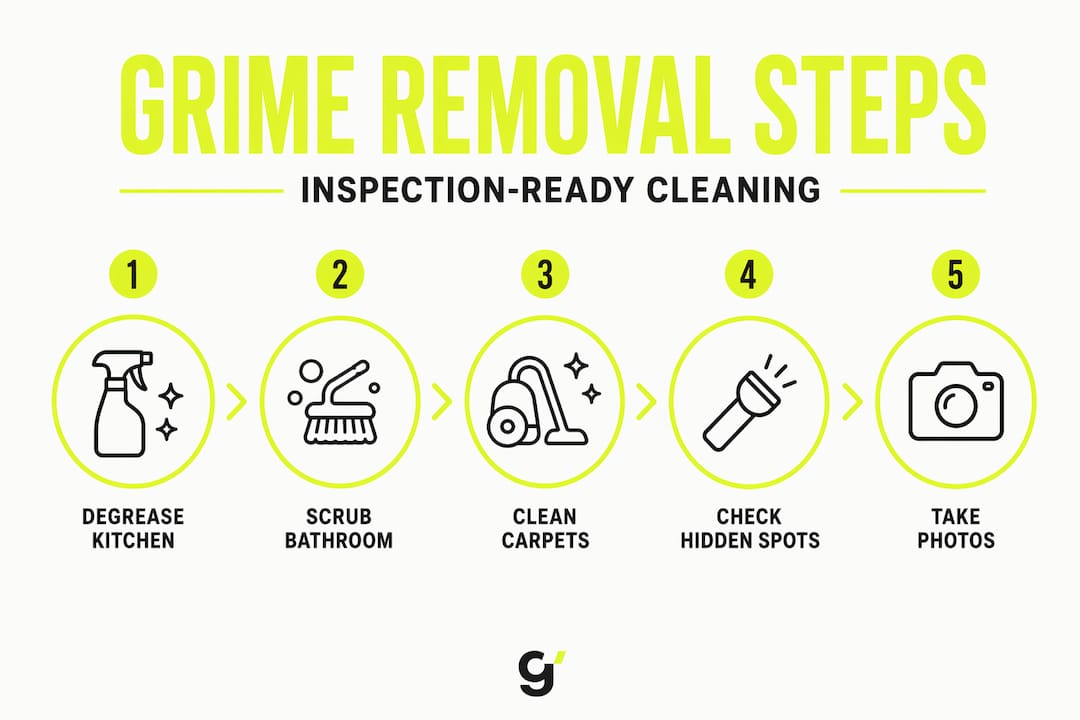
Pro Tip: Start your end-of-lease cleaning in the kitchen, specifically the oven and range hood, at least a week before your inspection. These areas require soaking time, not just scrubbing, and tackling them last-minute leads to rushed, incomplete results.
Effective cleaning methods for tackling grime
The biggest mistake tenants make is reaching for the most aggressive product available, assuming that stronger means more effective. It rarely does. Harsh abrasives can scratch benchtops, cloud shower screens, and strip protective coatings from appliance surfaces, which can turn a cleaning issue into a property damage issue.
Natural methods like vinegar and baking soda effectively break down buildup without damaging finishes. Here is a practical step-by-step approach that works across most surfaces:
-
Soften before you scrub. Apply a cleaning solution and let it sit for 10 to 20 minutes before touching it. For ovens, a paste of baking soda and water applied overnight makes the next morning's clean dramatically easier. For limescale, white vinegar soaked on a cloth and left on the tap for 30 minutes dissolves mineral deposits that scrubbing alone will not shift.
-
Use the right tools. A soft toothbrush on seams and hinges and warm, damp cloths can safely loosen residue more effectively than abrasive scrubbing. Microfibre cloths are excellent on glass and stainless steel. Avoid steel wool, harsh scouring pads, or anything abrasive on painted or coated surfaces.
-
Work top to bottom, dry to wet. Dust and dry wipe first, so debris falls to lower surfaces you have not yet cleaned. Move to damp wiping, then wet scrubbing of tiles and grout. This sequencing stops you cleaning the same area twice.
-
Rinse and dry thoroughly. Leaving cleaning product residue on surfaces, particularly in bathrooms and kitchens, creates new streaks and buildup. Rinse with clean water and dry with a microfibre cloth to leave surfaces streak-free.
-
Carpets need more than vacuuming. For stained carpets, a mixture of warm water, a few drops of dish soap, and white vinegar applied with a cloth and blotted (not rubbed) can lift mild stains. For deep staining, consider a carpet cleaning machine hire or a professional service.
A comprehensive post-tenancy cleaning checklist covers smudge removal, oven degreasing, limescale removal, carpet cleaning, and dusting window sills. Working from a written checklist prevents the common experience of thinking you are done and then failing inspection on something you forgot.
Pro Tip: For safe cleaning on delicate surfaces, test any solution on a small, hidden area first. This 30-second check can save you from an expensive surface damage claim at inspection.
Documenting condition to protect your bond
Cleaning well is half the job. Proving you cleaned well is the other half.
Landlords approve units more readily when they are returned as per the initial inventory, and disputes almost always come down to conflicting claims about what the property looked like before your tenancy began. The tenants who win those disputes are the ones with dated evidence.
Here is how to build a documentation record that protects you:
- At move-in, photograph every room from multiple angles. Capture existing stains, marks, and damage with close-up shots. Upload these to cloud storage with automatic date stamps the same day.
- During tenancy, if you notice new damage or pre-existing issues you missed initially, photograph and notify your property manager in writing. A text message creates a timestamp.
- At move-out, recreate the same photos from the same angles. Side-by-side comparisons are your most powerful evidence in a dispute.
- Keep your lease terms and condition reports. These documents set the agreed standard, and referencing them in any dispute gives your claims authority.
Dated photos and videos from the tenancy start are the most reliable dispute tool against unfair deductions. Tenants can successfully challenge unwarranted cleaning charges using dated move-in evidence and clear lease terms. That means the photos you take on your first day could be worth hundreds of dollars when you move out.
Do not skip this step because you trust your landlord. Even with the best relationships, people remember things differently after two years. Protect yourself with evidence rather than goodwill.
When to call in professional cleaners
Some grime situations are simply beyond DIY territory. If you have lived in a property for several years, if the oven has never been cleaned, or if there is mould penetration in grout and silicone that does not respond to surface treatment, a professional service is worth serious consideration.
Professional post-tenancy cleaning typically covers:
- Deep oven and appliance degreasing with commercial-grade products
- Grout and tile restoration in bathrooms and kitchens
- Carpet steam cleaning with odour neutralisation
- Window and track cleaning, inside and out
- Full appliance cleaning including behind and underneath
The cost calculation is straightforward. Professional cleaning often costs $150 to $500 depending on the extent of work required, but a failed inspection can result in the landlord hiring their own cleaner at premium rates and deducting the full amount from your bond. Often the professional fee you choose to pay is less than the deduction you avoid.
A professional service also delivers results against a documented standard, which supports your dispute position if any post-inspection questions arise.
My take on where tenants go wrong
I have seen the same pattern repeat more times than I can count. A tenant spends the final weekend furiously scrubbing, runs out of time on the kitchen, and loses a significant bond deduction for an oven they intended to clean but never got to. The grime was not the real problem. The plan was.
What I have learned is that tenants consistently underestimate how cumulative grime works. Grease that builds for 18 months does not come off in 20 minutes of scrubbing. It needs soaking, the right agents, and time. Last-minute marathons cannot replace that.
My strongest recommendation is to treat the final two weeks of your tenancy as a staged cleaning project, not a single event. Tackle one room per day rather than every room in a weekend. This approach produces better results and far less stress during an already demanding moving period.
The other thing tenants miss is that documentation and communication matter as much as cleaning quality. A spotless property with no move-in evidence is harder to defend than a well-documented average clean. Start the evidence trail on your first day, and the final inspection becomes a much calmer experience.
— Lead
Let Grimescene handle the hard work
When end-of-lease grime is beyond what an afternoon of cleaning can solve, Grimescene is built for exactly this situation. Their non-toxic, eco-friendly approach targets the kind of deep-set grease, limescale, and mould that rental properties accumulate over time, without the surface damage risk that comes with harsh chemical products.

Their Scene Reset protocol is designed specifically for rental turnovers, delivering inspection-ready results that protect your bond and give property managers no reason to reach for the deduction form. Whether you are managing a long-term lease exit or a high-frequency short-term rental, their post-tenancy cleaning services are tailored to the specific demands of end-of-lease standards. Visit Grimescene to explore service options and book a clean that gives you full confidence walking into your final inspection.
FAQ
What is post-tenancy grime buildup?
Post-tenancy grime buildup refers to accumulated grease, soap scum, limescale, mould, and stubborn stains that go beyond normal wear and tear, making tenants responsible for removing them before vacating a rental property.
Does grime buildup affect bond returns?
Yes. Landlords are entitled to deduct cleaning costs from your bond when grime exceeds the standard expected under your lease terms, particularly in kitchens, bathrooms, and carpeted areas.
What areas are most likely to fail inspection?
Ovens, range hoods, bathroom grout and silicone, carpets, kitchen handles, and behind large appliances are the most frequently cited areas in post-tenancy cleaning disputes.
Can I dispute unfair cleaning charges?
Yes. Tenants can dispute deductions by providing dated move-in photos and videos that demonstrate the property was returned in the same or better condition than when they took possession.
When should I hire a professional cleaner?
If grime buildup includes mould penetration, years of unaddressed grease, or stained carpets that do not respond to household cleaning, professional services are typically more cost-effective than the bond deduction they prevent.