
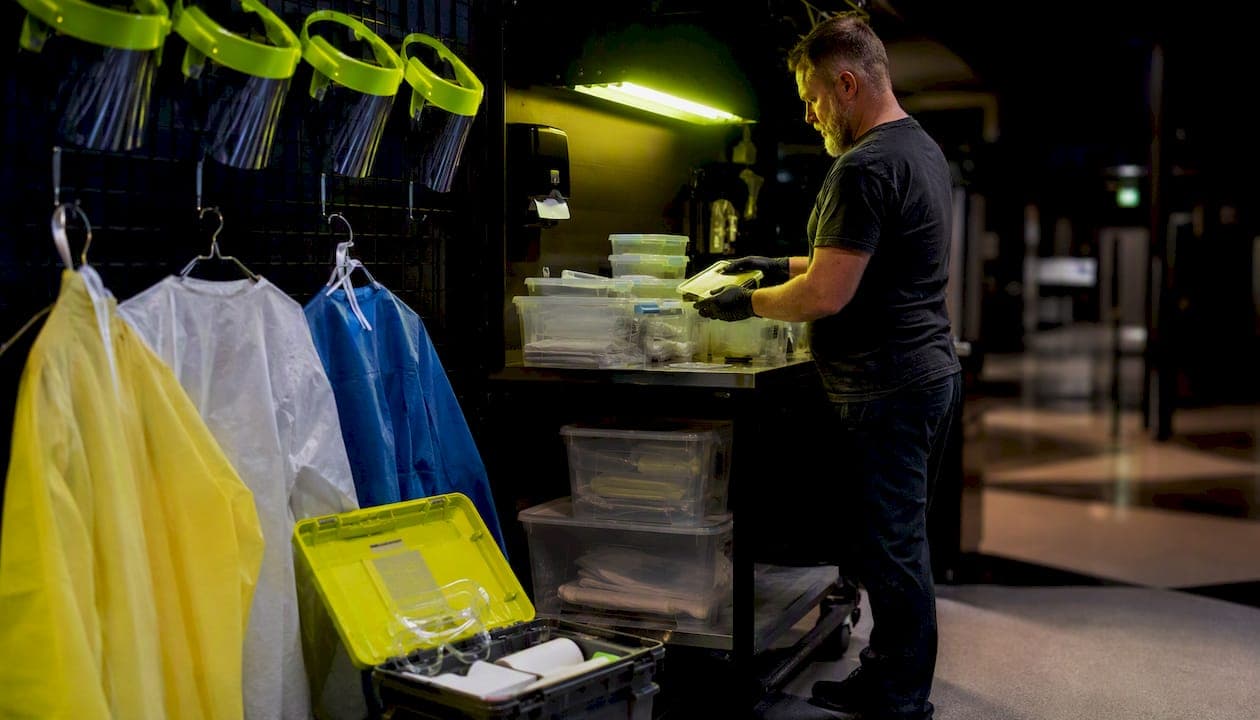
If you are facing a blood or body fluid spill right now, stop and do three things before anything else: isolate the area, put on appropriate personal protective equipment (PPE), and either follow the WHS-compliant procedure below for small spills or call a licensed remediation service for anything larger, involving sharps, or on porous surfaces.
Immediate actions:
- Restrict access to the spill area immediately. Use tape, signage, or a closed door. Do not allow anyone without PPE to enter.
- Don PPE before approaching the spill (gloves, eye protection, fluid-resistant apron or gown, mask).
- If sharps are visible, do not touch them without a rigid sharps container and tongs.
- Call emergency services (000) if there is an injured person, or call a licensed remediation contractor if the spill is large, involves trauma, or you are unsure of the source.
- Secure the area and wait for qualified help if you have any doubt about your ability to manage the spill safely.
Pro Tip: When calling emergency services or a licensed contractor, tell them the location, approximate spill size (in square metres if possible), whether sharps are present, and whether vulnerable people (children, elderly, immunocompromised) are nearby. This determines the response level and the PPE the crew will bring.
Do not attempt a DIY clean if any of the following apply:
- The spill covers a hand-width or larger area, or has soaked into carpet, upholstery, or a mattress.
- Sharps (needles, syringes, broken glass with blood) are present.
- The scene involves trauma, suspected suicide, or unknown fluids.
- There is any risk of environmental runoff into drains or common areas.
- You do not have access to therapeutic-grade disinfectant and appropriate PPE.
Key takeaways
Safe bloodborne pathogen cleanup requires isolating the area, using correct PPE, removing bulk material before applying disinfectant, double-bagging all waste as clinical waste, and engaging a licensed contractor for anything beyond a small, contained spill on a hard surface.
| Point | Details |
|---|---|
| Isolate first, always | Restrict access before approaching any blood spill — no PPE, no entry. |
| PPE sequence matters | Don gloves last; doff gloves first; wash hands immediately after doffing. |
| Disinfectant after bulk removal | Apply disinfectant only after absorbed material is removed to avoid aerosols and dilution. |
| All waste is clinical waste | Double-bag, label, and arrange licensed clinical waste collection — general bins are not compliant. |
| Grimescene for complex scenes | Grimescene's deep decontamination service provides SWMS, trained technicians, and written clearance documentation. |
Pro Tip: Keep your spill kit in a sealed, labelled container near the most likely exposure point (laundry, bathroom, or first-aid station). Attach a laminated one-page procedure card to the outside so anyone can follow the steps without hunting for instructions.
Table of Contents
- Why does bloodborne pathogen cleanup matter under Australian WHS law?
- Step-by-step bloodborne pathogen cleanup procedure
- What PPE do you need, and how do you take it off safely?
- Which disinfectants work, and how long do they need to sit?
- How do you handle contaminated waste and sharps safely?
- When should you call a licensed remediation service?
- What training, reporting, and post-exposure steps are required?
- The human factor is what actually gets people hurt
- Grimescene's rapid response biohazard service: what to expect
- Sources
Why does bloodborne pathogen cleanup matter under Australian WHS law?
Bloodborne viruses (BBVs) — primarily hepatitis B (HBV), hepatitis C (HCV), and HIV — transmit through contact with infected blood or body fluids via percutaneous injury (needlestick or cut), mucous membrane contact (eyes, nose, mouth), or broken skin. The risk is real in workplaces ranging from aged care and construction sites to short-term rental properties and community facilities.
Under Australian WHS legislation, persons conducting a business or undertaking (PCBUs) must eliminate or, where elimination is not reasonably practicable, minimise risks from biological hazards — and that obligation extends to bloodborne pathogen exposure. Providing PPE and training free of charge to workers is not optional; it is a legal duty. Directing untrained staff to clean a blood spill without proper equipment and instruction creates direct liability for the employer or property manager.
SafeWork NSW's code of practice for managing BBV exposure requires a pre-established response plan, restricted access to spill areas, specialised PPE, and therapeutic-grade decontamination agents. The same guidance makes clear that training and PPE must be provided at no cost to workers.
Who is legally competent to perform a cleanup? Workers must be trained in BBV risk management before they handle any contaminated material. Competency means understanding transmission routes, correct PPE use, disinfectant selection, and waste disposal. Safe Work Australia's baseline controls include routine cleaning, ventilation, vaccination encouragement, and provision of appropriate PPE as the minimum standard for managing biological hazards. PPE sits at the bottom of the hierarchy of controls — it is the last line of defence, not the first.
Standard household cleaners and untrained cleaning staff routinely lack the training, PPE, and waste-chain access required for regulatory biohazard remediation. Directing an untrained cleaner to mop up a blood spill is not just unsafe; it is a WHS breach.
Step-by-step bloodborne pathogen cleanup procedure
Follow this sequence exactly. Skipping or reordering steps is where secondary exposures happen.
For small spills (drops, drips, or a surface area smaller than your hand)
- Prepare. Don PPE before approaching: nitrile gloves, fluid-resistant apron, eye protection, surgical mask. Place a biohazard bag and absorbent material within reach before you move closer.
- Restrict access. Place signage or tape around the area. No one without PPE enters.
- Absorb bulk material. Cover the spill with paper towels or absorbent granules. Do not wipe outward — work from the edges inward to contain the spill footprint.
- Remove bulk safely. Use a scraper or cardboard to lift the absorbed material into a biohazard bag. Seal and set aside.
- Apply disinfectant. Apply a therapeutic-grade disinfectant (or freshly prepared bleach solution) to the surface. Allow the full contact time specified by the manufacturer before wiping. Do not pour disinfectant over bulk material that has not yet been removed — this generates aerosols and spreads contamination.
- Wipe and re-apply if needed. Wipe the surface clean, then apply a second round of disinfectant if the surface is porous or heavily soiled.
- Bag all waste. Place used absorbents, wipes, and disposable PPE into the biohazard bag. Double-bag, seal, and label.
- Decontaminate reusable tools. Any scraper, pan, or container used must be disinfected before storage or reuse.
- Doff PPE safely. Follow the doffing sequence (see PPE section below).
- Wash hands. Soap and water for at least 20 seconds, even after glove removal.
For large or complex spills
Large spills (hand-width or larger), spills on carpets or upholstered furniture, outdoor runoff, trauma scenes, or any scene involving sharps require a different approach. SafeWork NSW guidance recommends using a spill kit containing granular disinfectant (10,000 ppm available chlorine) to absorb bulk material and reduce aerosols before any cleaning begins. For porous furnishings — mattresses, carpet, upholstered chairs — professional deep decontamination or replacement is often the only option that meets infection control and WHS expectations. Domestic laundering is not sufficient.
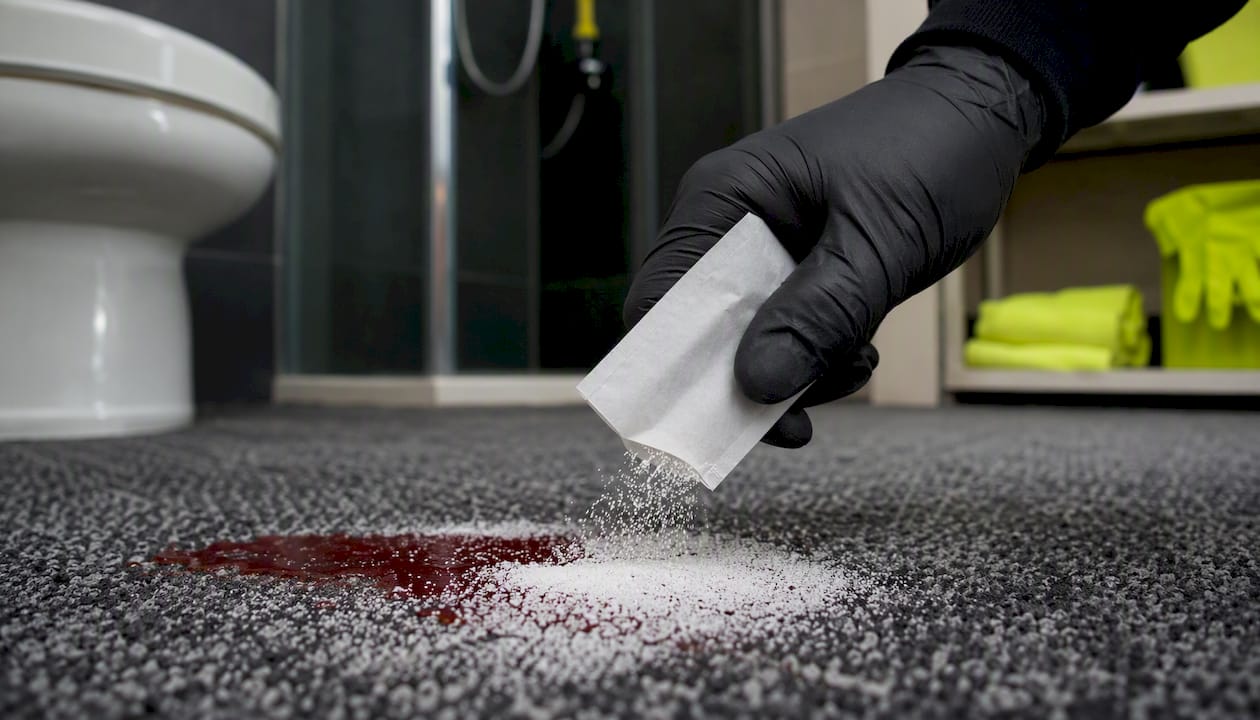
Do not use high-pressure washing. It generates aerosols that spread contaminated droplets across a wider area. Call a licensed remediation service.
Spill kit contents checklist:
- Disposable nitrile gloves (at least two pairs)
- Fluid-resistant gown or apron
- Eye protection (goggles or face shield)
- Surgical mask or P2/N95 respirator
- Absorbent granules or paper towels
- Rigid scraper and disposable pan
- Therapeutic-grade disinfectant (spray or wipes)
- Biohazard bags (heavy-duty, labelled), minimum two per kit
- Rigid sharps container
- Signage or barrier tape
- Disposable boot covers (for larger spills)
Pro Tip: In a multi-unit dwelling or short-term rental, confine the spill before opening any doors to common areas. Place absorbent material at the threshold of the affected room and use a separate bin liner as a temporary barrier. Advise building management before moving any waste through shared corridors.
What PPE do you need, and how do you take it off safely?
The minimum PPE for cleaning bloodborne material is: disposable nitrile gloves, a fluid-resistant gown or apron, eye protection (goggles or face shield), and a surgical mask. Where aerosol risk is present — high-pressure cleaning, large spills, or enclosed spaces with poor ventilation — a fit-tested P2/N95 respirator replaces the surgical mask. Rigorous decontamination protocols and correct PPE use reduce occupational exposure risks during blood cleanup operations.
Donning (putting PPE on)
- Wash hands thoroughly before touching any PPE.
- Put on the gown or apron first.
- Put on the mask or respirator and perform a fit check (press the mask to your face and exhale sharply — no air should escape around the edges).
- Put on eye protection.
- Put on gloves last, pulling the cuff over the gown sleeve.
Check glove integrity before approaching the spill: look for tears, pinholes, or discolouration. Double-gloving is advisable for large or complex spills.
Doffing (taking PPE off) — this is where most exposures occur
- Remove outer gloves first by peeling from the wrist, turning them inside out. Hold in the gloved hand.
- Slide two fingers of the bare hand under the remaining glove cuff and peel it off, enclosing the first glove inside. Place both in the biohazard bag.
- Remove eye protection by touching only the arms or strap — never the front lens.
- Remove the gown by untying the back, rolling it away from you (contaminated side inward), and placing it in the biohazard bag.
- Remove the mask by touching only the ties or ear loops. Place in the biohazard bag.
- Wash hands immediately with soap and water for at least 20 seconds.
Designate a single doffing zone — a clean area just outside the spill perimeter — and never doff PPE inside the contaminated zone.
Pro Tip: Check your spill kit PPE every three months. Nitrile gloves degrade over time, especially in heat. Replace any gloves that feel brittle, sticky, or show discolouration, and check that the respirator seal is intact.
Which disinfectants work, and how long do they need to sit?
Use a Therapeutic Goods Administration (TGA)-listed disinfectant with proven efficacy against bloodborne viruses as your first choice. Where a TGA-listed product is not available, a freshly prepared sodium hypochlorite (bleach) solution is acceptable for many non-porous surfaces.
Practical guidance:
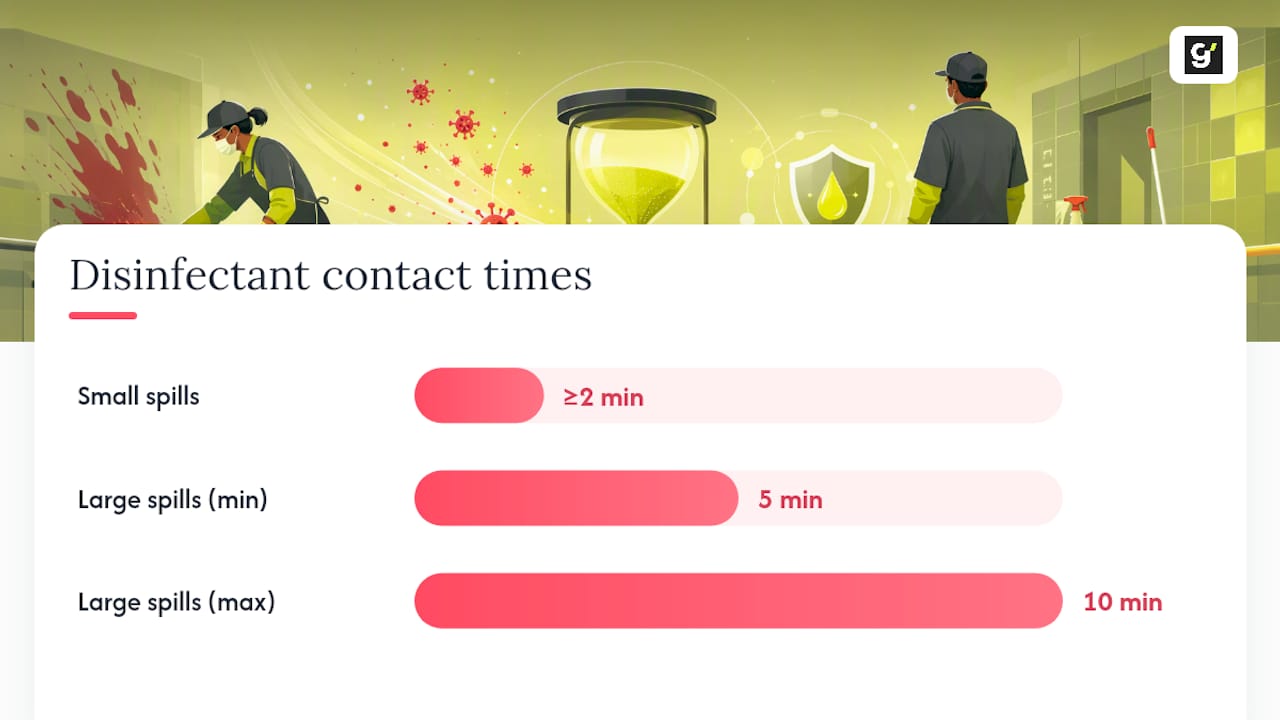
- For small spills on hard, non-porous surfaces: a 1,000 ppm available chlorine solution (roughly 1 part household bleach to 49 parts water) with a contact time of at least two minutes.
- For large spills or heavily contaminated surfaces: 10,000 ppm available chlorine solution, following manufacturer directions for contact time (typically five to ten minutes).
- Always apply disinfectant to a surface that has already had bulk material removed. Applying it to pooled blood dilutes the active ingredient and generates aerosols.
- After the contact time, wipe the surface clean and allow it to air dry.
Material compatibility matters. Bleach corrodes metal, damages some plastics, and can bleach fabric. For metal surfaces, stainless steel fittings, or coloured grout, use a quaternary ammonium compound (QAC) or hydrogen peroxide-based product with confirmed BBV efficacy. Always check the product label for surface compatibility before use. A detergent pre-clean followed by a separate disinfectant step is more effective than a single combined product on heavily soiled surfaces, because organic matter (blood, tissue) inactivates many disinfectants on contact.
Document the product name, batch or lot number, expiry date, dilution used, and contact time applied for every cleanup. This record is part of your WHS incident documentation and may be requested by a regulator or insurer.
How do you handle contaminated waste and sharps safely?
Treat every item that contacted blood or body fluids as clinical waste. That includes used absorbents, wipes, disposable PPE, and any packaging that was opened in the spill zone.
Waste handling checklist:
- Place all contaminated material in a heavy-duty biohazard bag. Seal it, then place it inside a second biohazard bag (double-bag). Label clearly with "Biohazard — Clinical Waste."
- Store sealed bags in a secure, cool location away from public access pending collection. Do not leave bags in common areas, bins accessible to the public, or near food storage.
- Contact a licensed clinical waste contractor for collection. In residential settings, contact your local council or state EPA for guidance on approved disposal options — general household bins are not appropriate for clinical waste.
- For sharps: use a rigid, puncture-resistant sharps container (yellow lid, AS 4031-compliant). Never re-cap needles. Never force contents into a full container. When the container reaches the fill line, seal it and arrange collection through a licensed sharps-waste contractor, a participating pharmacy, or your local council's sharps disposal programme.
State environmental protection authorities and local councils maintain lists of approved clinical waste contractors. In New South Wales, the NSW EPA provides guidance on regulated waste transport and disposal. Contact your state EPA or local council before attempting to transport clinical waste yourself — transport of regulated waste without the correct documentation is a separate legal offence.
Pro Tip: For short-term rental properties, keep a sealed, labelled sharps container in the property's cleaning kit and brief your turnover team on what to do if they find a needle. The answer is always: do not touch it, place a waste bin over it, and call the property manager. Never ask a turnover cleaner to handle sharps without specific training and a rigid container.
When should you call a licensed remediation service?
Call a professional for any of the following: a spill larger than a hand-width, a trauma scene, sharps present, porous furnishings contaminated, environmental runoff into drains or outdoor areas, or where a regulatory report is likely. This is not a cost-versus-DIY question. It is a liability and safety question.
What a licensed remediator provides:
- A site-specific Safe Work Method Statement (SWMS) prepared before work begins, covering hazard identification, control measures, and emergency procedures. Industry SWMS templates recommend clinical-grade PPE, decontamination steps, and a documented waste chain to licensed collectors.
- Trained technicians who have completed BBV risk management training and are competent in correct PPE use, disinfection, and waste handling.
- Clinical-grade disinfectants and equipment not available to the general public.
- A documented waste chain from the site to a licensed clinical waste facility.
- Clearance documentation confirming the area has been decontaminated to an acceptable standard — this is what you hand to your insurer, body corporate, or regulator.
Questions to ask before booking:
- Can you provide your current public liability insurance certificate and any relevant licences for clinical waste handling?
- Will you prepare a site-specific SWMS before work begins?
- Who is your licensed clinical waste contractor, and can you provide the waste consignment documentation after the job?
- How do you verify decontamination is complete (surface testing, visual inspection, documentation)?
- Do you offer non-toxic or eco-friendly disinfectant options? (Relevant for properties with children, pets, or sensitive occupants.)
Practical notes for clients:
- Clear access to the affected area before the crew arrives. Remove uncontaminated valuables if safe to do so.
- Expect the crew to restrict access to the area during the job. This is not optional — it is part of their SWMS.
- A standard residential biohazard clean usually takes several hours depending on spill size and surface type. Trauma scenes or large-area contamination take longer.
- Ask for clearance documentation in writing before the crew leaves the site.
What training, reporting, and post-exposure steps are required?
Training and SWMS duties
PCBUs must have site-specific SWMS or standard operating procedures (SOPs) for BBV risk, provide training before workers perform any cleanup task, and maintain training records. Biological hazards must be treated as a dynamic risk requiring ongoing training and auditing, not a one-off induction. Commercial SWMS products aligned with WHS and infection control standards provide a practical starting point for workplaces that do not have existing documentation.
Training checklist — who needs it and what it covers:
- Any worker who may encounter blood or body fluids in the course of their duties (cleaning staff, first aiders, facilities managers, short-term rental hosts managing their own properties).
- Content: transmission routes and BBV risks, correct PPE selection and use, spill response procedure, disinfectant selection and contact times, waste disposal and sharps handling, incident reporting, and post-exposure first aid.
- Frequency: on induction, after any significant incident, and at least annually for high-risk roles.
- Competency check: workers should be able to demonstrate correct donning and doffing, not just recite the steps.
Incident reporting and recordkeeping
Every bloodborne exposure incident must be recorded in the workplace injury register and reported to the relevant state WHS regulator if it meets the notifiable incident threshold. Check with SafeWork NSW, WorkSafe Victoria, or your state equivalent for the specific threshold in your jurisdiction.
Post-exposure actions
If a worker has a potential exposure (needlestick, splash to eyes or mouth, skin contact with blood through broken skin):
- First aid immediately: flush the affected area with water for at least 15 minutes (eyes) or wash skin with soap and water.
- Complete an incident report before the end of the shift.
- Refer the worker to a clinician or emergency department within two hours for risk assessment, source testing where available, and consideration of post-exposure prophylaxis (PEP) for HIV.
- Discuss hepatitis B vaccination status. Workers who are not immune to HBV should receive hepatitis B immunoglobulin and/or vaccine as soon as possible after exposure.
- Follow up with the treating clinician at six weeks, three months, and six months post-exposure for BBV testing.
SafeWork NSW's BBV guidance and Safe Work Australia's WHS duties pages are the primary references for compliance detail in your jurisdiction.
The human factor is what actually gets people hurt
The most common failure in bloodborne pathogen cleanup is not the wrong disinfectant or an incomplete spill kit. It is human error during doffing and in the first 90 seconds after the spill is discovered, when people act before they think.
Experienced remediation teams know this pattern well. A worker sees blood, grabs paper towels, and starts wiping before gloves are on. Or they complete a clean correctly, then peel off their gloves and immediately touch their face. The procedure is right; the execution breaks down at the edges.
A few things that actually make a difference on site: designate a single doffing zone before the job starts and mark it with tape or a clean mat. Anyone who doffs outside that zone has contaminated a clean area. Keep the spill kit sealed until you are ready to use it — an open kit in a shared cupboard accumulates dust, degraded gloves, and missing items. And document the cleanup immediately, not at the end of the shift. Memory of contact times and product batch numbers fades fast.
For property managers and hosts, the most overlooked step is client communication. Occupants or guests returning to a property after a biohazard clean need to know what was done, what products were used, and when the area is safe to re-enter. A one-page clearance summary from the remediator is not just good practice; it protects you from a complaint six weeks later.
Grimescene's rapid response biohazard service: what to expect
When a spill is beyond the scope of a trained staff member or property manager, Grimescene's deep decontamination service is built for exactly this situation. The service covers site assessment, a site-specific SWMS, trained technicians using clinical-grade and non-toxic disinfectant protocols, a documented waste chain to licensed clinical waste contractors, and written clearance documentation for compliance and insurance purposes.

For time-critical incidents, the Rapid Response 2-Hour Tactical Clean gets a trained crew on site fast, with all PPE and equipment on board. Grimescene's non-toxic protocols mean the property is safe for re-entry by families, pets, and guests without the residual chemical odour that follows a heavy bleach treatment. Short-term rental hosts can request turnover documentation that satisfies platform and body corporate requirements.
To book or request an assessment, visit the deep decontamination page or contact Grimescene directly. Your property details and spill description are all that is needed to get a response plan started.
Sources
- How to manage BBV exposure risks in the workplace – hepatitis B virus, hepatitis C virus and HIV (SafeWork NSW PDF)
- Biological hazards - WHS duties | Safe Work Australia
- Pubmed
This article is general information, not a substitute for advice from a qualified doctor. Consult a qualified healthcare professional about your own circumstances before acting on anything here.